In this article, you will learn how to fine-tune open-source large language models for customer support using Unsloth and QLoRA, from dataset preparation through training, testing, and comparison.
Topics we will cover include:
- Setting up a Colab environment and installing required libraries.
- Preparing and formatting a customer support dataset for instruction tuning.
- Training with LoRA adapters, saving, testing, and comparing against a base model.
Let’s get to it.

How to Fine-Tune a Local Mistral/Llama 3 Model on Your Own Dataset
Introduction
Large language models (LLMs) like Mistral 7B and Llama 3 8B have shaken the AI field, but their broad nature limits their application to specialized areas. Fine-tuning transforms these general-purpose models into domain-specific experts. For customer support, this means an 85% reduction in response time, a consistent brand voice, and 24/7 availability. Fine-tuning LLMs for specific domains, such as customer support, can dramatically improve their performance on industry-specific tasks.
In this tutorial, we’ll learn how to fine-tune two powerful open-source models, Mistral 7B and Llama 3 8B, using a customer support question-and-answer dataset. By the end of this tutorial, you’ll learn how to:
- Set up a cloud-based training environment using Google Colab
- Prepare and format customer support datasets
- Fine-tune Mistral 7B and Llama 3 8B using Quantized Low-Rank Adaptation (QLoRA)
- Evaluate model performance
- Save and deploy your custom models
Prerequisites
Here’s what you will need to make the most of this tutorial.
- A Google account for accessing Google Colab. You can check Colab here to see if you are ready to access.
- A Hugging Face account for accessing models and datasets. You can sign up here.
After you have access to Hugging Face, you will need to request access to these 2 gated models:
- Mistral:
Mistral-7B-Instruct-v0.3 - Llama 3:
Meta-Llama-3-8B-Instruct
And as far as the requisite knowledge you should have before starting, here’s a concise overview:
- Basic Python programming
- Be familiar with Jupyter notebooks
- Understanding of machine learning concepts (helpful but not required)
- Basic command-line knowledge
You should now be ready to get started.
The Fine-Tuning Process
Fine-tuning adapts a pre-trained LLM to specific tasks by continuing training on domain-specific data. Unlike prompt engineering, fine-tuning actually modifies model weights.
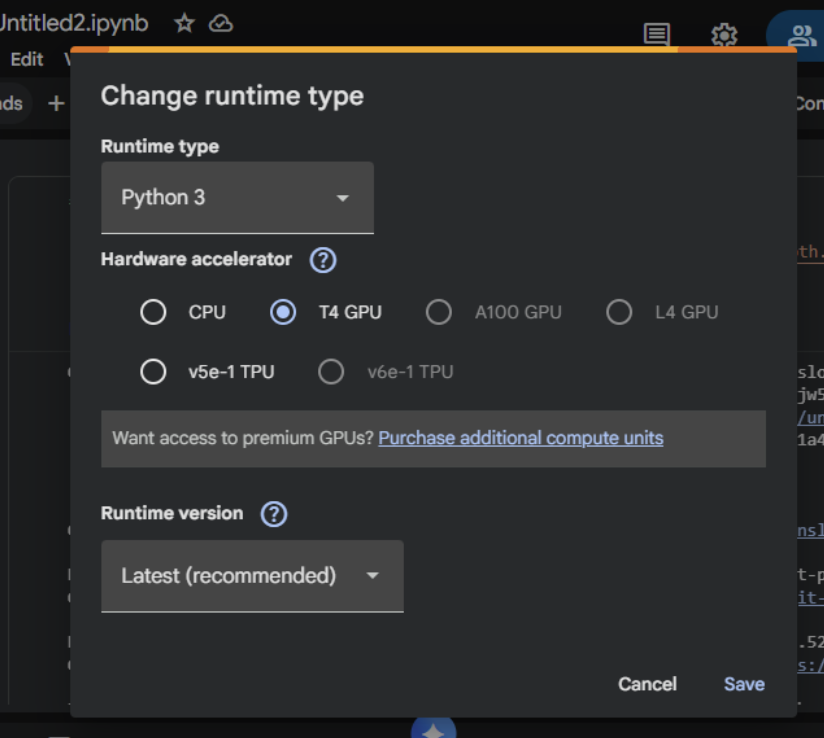
Step 1: Getting Started with Google Colab
- Visit Google Colab
- Create new notebook: File → New Notebook
- Give it a preferred name
- Set GPU: Runtime → Change runtime type → T4 GPU
Step 2: Install Unsloth (Run This First)
Here, we will install Unsloth and its dependencies. Unsloth handles CUDA setup automatically.
|
!pip install “unsloth[colab-new] @ git+https://github.com/unslothai/unsloth.git” !pip install —no–deps xformers trl peft accelerate bitsandbytes
print(“Unsloth installed successfully!”) |
Step 3: Import Unsloth and Setup
The next step is to import Unsloth and perform basic checks.
|
from unsloth import FastLanguageModel import torch from trl import SFTTrainer from transformers import TrainingArguments from datasets import Dataset import pandas as pd import numpy as np print(“Unsloth loaded successfully!”) print(f“PyTorch: {torch.__version__}”) print(f“CUDA: {torch.cuda.is_available()}”) print(f“GPU: {torch.cuda.get_device_name(0) if torch.cuda.is_available() else ‘None’}”) |
Step 4: Create Customer Support Dataset
We will supply realistic customer support data in this section for the purpose of fine-tuning the model.
|
1 2 3 4 5 6 7 8 9 10 11 12 13 14 15 16 17 18 19 20 21 22 23 24 25 26 27 28 29 30 31 32 33 34 35 36 37 38 39 40 41 42 43 44 45 46 47 48 49 50 51 52 53 54 55 |
print(“Creating customer support Q&A dataset…”)
# Create realistic customer support data customer_support_data = [ { “instruction”: “You are a helpful customer support agent. Answer clearly and professionally.”, “input”: “How do I reset my password?”, “output”: “To reset your password: 1) Click ‘Forgot Password’ on the login page 2) Enter your registered email 3) Check your inbox for the reset link 4) Click the link and create a new password. Check your spam folder if not received within 5 minutes.” }, { “instruction”: “You are a helpful customer support agent. Answer clearly and professionally.”, “input”: “My payment was declined, what should I do?”, “output”: “Common solutions: 1) Check that the card has sufficient funds 2) Ensure the card is not expired 3) Contact your bank to unblock the transaction 4) Try an alternative payment method like PayPal 5) Wait 24 hours before retrying.” }, { “instruction”: “You are a helpful customer support agent. Answer clearly and professionally.”, “input”: “How do I cancel my subscription?”, “output”: “To cancel: 1) Log in to your account 2) Go to ‘Billing & Subscriptions’ 3) Click ‘Cancel Subscription’ 4) Confirm cancellation. Your access continues until the end of the billing period. No partial refunds.” }, { “instruction”: “You are a helpful customer support agent. Answer clearly and professionally.”, “input”: “The app keeps crashing on startup”, “output”: “Troubleshooting steps: 1) Update the app to the latest version 2) Restart your device 3) Clear the app cache/data 4) Reinstall the app 5) Ensure 500MB free storage 6) Update your device OS. If it persists, contact support with error logs.” }, { “instruction”: “You are a helpful customer support agent. Answer clearly and professionally.”, “input”: “Where is my order tracking information?”, “output”: “You can find tracking: 1) Check the confirmation email 2) Log into your account > Orders 3) Click the tracking number. Standard shipping: 3-5 business days. Contact the carrier with the tracking number for the exact location.” }, { “instruction”: “You are a helpful customer support agent. Answer clearly and professionally.”, “input”: “How do I contact customer support?”, “output”: “Support options: 1) Live chat: Mon–Fri 9AM–6PM EST 2) Email: support@company.com (response within 24h) 3) Phone: 1-800-123-4567 4) Twitter: @CompanySupport. Please have your account email ready.” }, { “instruction”: “You are a helpful customer support agent. Answer clearly and professionally.”, “input”: “Can I get a refund?”, “output”: “Refund policy: 1) Digital products: Refund within 14 days if not used 2) Subscriptions: No refunds for partial months 3) Physical goods: Return within 30 days with receipt. Contact billing@company.com with your order ID.” }, { “instruction”: “You are a helpful customer support agent. Answer clearly and professionally.”, “input”: “How do I change my email address?”, “output”: “To change your email: 1) Log in to your account 2) Go to Account Settings 3) Click ‘Change Email’ 4) Enter the new email 5) Verify via the confirmation email sent to the new address. The update takes effect immediately.” }, { “instruction”: “You are a helpful customer support agent. Answer clearly and professionally.”, “input”: “Is my data secure?”, “output”: “Yes, we use: 1) AES-256 encryption 2) SSL/TLS for all connections 3) Regular security audits 4) GDPR compliance 5) Data is never sold to third parties. Read our privacy policy for details.” }, { “instruction”: “You are a helpful customer support agent. Answer clearly and professionally.”, “input”: “Do you offer student discounts?”, “output”: “Yes! Student discount: 50% off. Requirements: 1) Valid .edu email OR 2) Student ID photo. Apply: Email student@company.com with proof. The discount is applied after verification.” }, ] |
You can also create more samples by duplicating and varying.
|
expanded_data = [] for item in customer_support_data * 30: # Creates 300 samples expanded_data.append(item.copy()) |
Now, we can convert to a dataset:
|
# Convert to dataset dataset = Dataset.from_pandas(pd.DataFrame(expanded_data))
print(f“Dataset created: {len(dataset)} samples”) print(f“Sample:\n{dataset[0]}”) |
Step 5: Choose Your Model (Mistral or Llama 3)
We will be using Mistral 7B for this walkthrough.
|
model_name = “unsloth/mistral-7b” print(f“Selected: {model_name}”) print(“Loading model (takes 2-5 minutes)…”) |
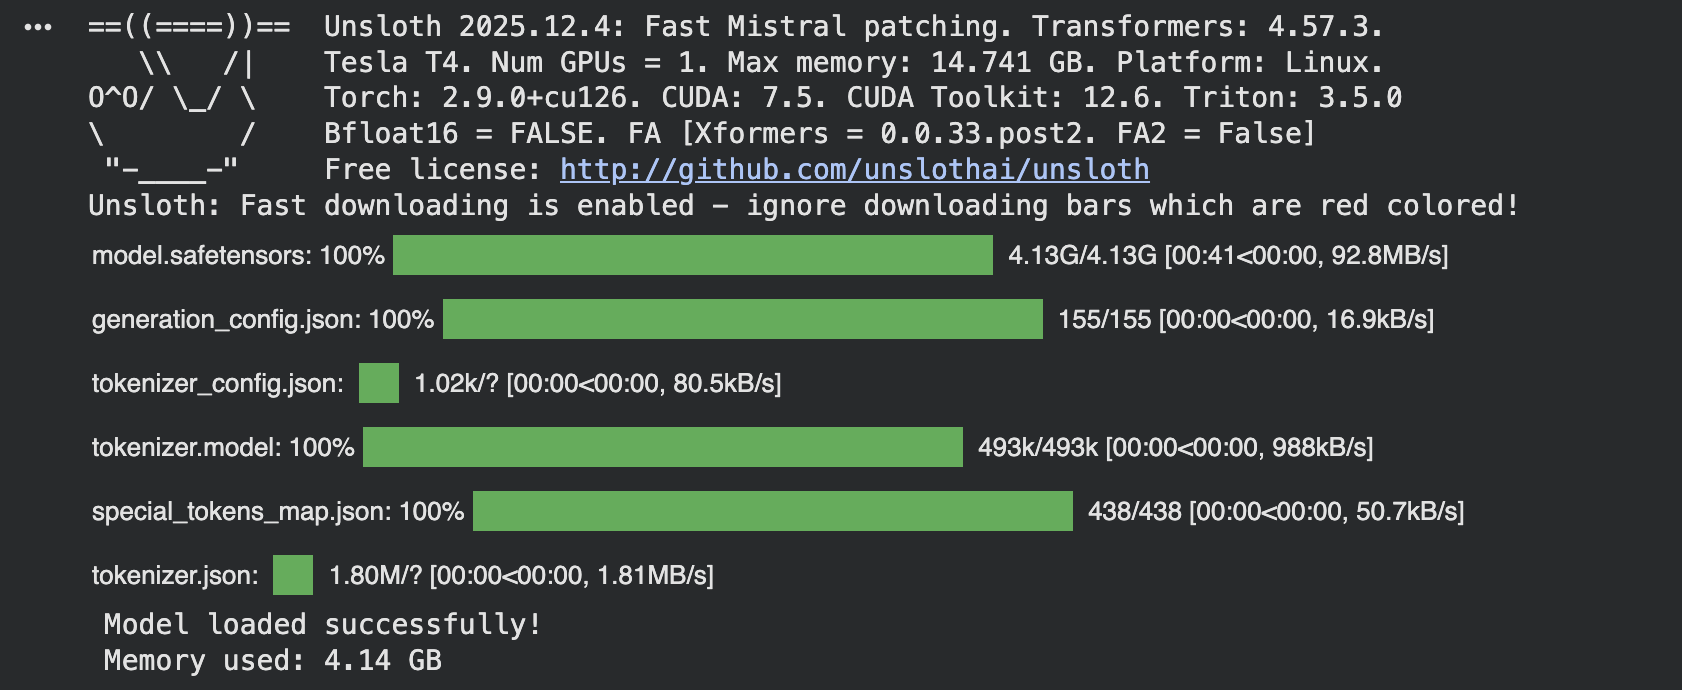
Step 6: Load Model with Unsloth (4x Faster!)
|
max_seq_length = 1024 dtype = torch.float16 load_in_4bit = True |
Load the model with Unsloth optimization and use the token = “hf_…” if you have gated models like Llama 3.
|
model, tokenizer = FastLanguageModel.from_pretrained( model_name=model_name, max_seq_length=max_seq_length, dtype=dtype, load_in_4bit=load_in_4bit, )
print(“Model loaded successfully!”) if torch.cuda.is_available(): print(f“Memory used: {torch.cuda.memory_allocated() / 1e9:.2f} GB”) |
The load_in_4bit quantization saves memory. Use float16 for faster training, and you can increase max_seq_length to 2048 for longer responses.
Step 7: Add LoRA Adapters (Unsloth Optimized)
LoRA is recommended for most use cases because it’s memory-efficient and fast:
|
model = FastLanguageModel.get_peft_model( model, r=16, target_modules=[“q_proj”, “k_proj”, “v_proj”, “o_proj”, “gate_proj”, “up_proj”, “down_proj”], lora_alpha=16, lora_dropout=0, bias=“none”, use_gradient_checkpointing=“unsloth”, random_state=3407, use_rslora=False, loftq_config=None, ) print(“LoRA adapters added!”) print(“Trainable parameters added: Only ~1% of total parameters!”) |
- target_modules: Which layers to adapt (attention + MLP)
- r=16: Higher = more adaptable, but more parameters
- lora_alpha=16: Scaling factor for LoRA weights
Step 8: Format Dataset for Training
|
1 2 3 4 5 6 7 8 9 10 11 12 13 14 15 16 17 18 19 20 21 22 23 24 25 26 27 28 29 30 31 32 33 34 35 36 37 38 39 40 41 42 43 44 45 46 47 48 |
def formatting_prompts_func(examples): “”“Format dataset for instruction fine-tuning.”“” if “mistral” in model_name.lower(): texts = [] for instruction, input_text, output in zip( examples[“instruction”], examples[“input”], examples[“output”] ): text = f“ texts.append(text) return {“text”: texts} elif “llama” in model_name.lower(): texts = [] for instruction, input_text, output in zip( examples[“instruction”], examples[“input”], examples[“output”] ): text = f“”“system {instruction} user {input_text} assistant {output}”“” texts.append(text) return {“text”: texts} else: texts = [] for instruction, input_text, output in zip( examples[“instruction”], examples[“input”], examples[“output”] ): text = f“”“### Instruction: {instruction}
### Input: {input_text}
### Response: {output}”“” texts.append(text) return {“text”: texts}
print(“Formatting dataset…”) dataset = dataset.map(formatting_prompts_func, batched=True) print(f“Dataset formatted: {len(dataset)} samples”) |
Output:

Step 9: Configure Training (Optimized by Unsloth)
|
1 2 3 4 5 6 7 8 9 10 11 12 13 14 15 16 17 18 19 20 21 22 23 24 25 26 |
trainer = SFTTrainer( model=model, tokenizer=tokenizer, train_dataset=dataset, dataset_text_field=“text”, max_seq_length=max_seq_length, args=TrainingArguments( per_device_train_batch_size=2, gradient_accumulation_steps=4, warmup_steps=5, max_steps=60, learning_rate=2e–4, fp16=not torch.cuda.is_bf16_supported(), bf16=torch.cuda.is_bf16_supported(), logging_steps=1, optim=“adamw_8bit”, weight_decay=0.01, lr_scheduler_type=“linear”, seed=3407, output_dir=“outputs”, report_to=“none”, ), )
print(“Trainer configured!”) print(“Training will be 2x faster with Unsloth!”) |
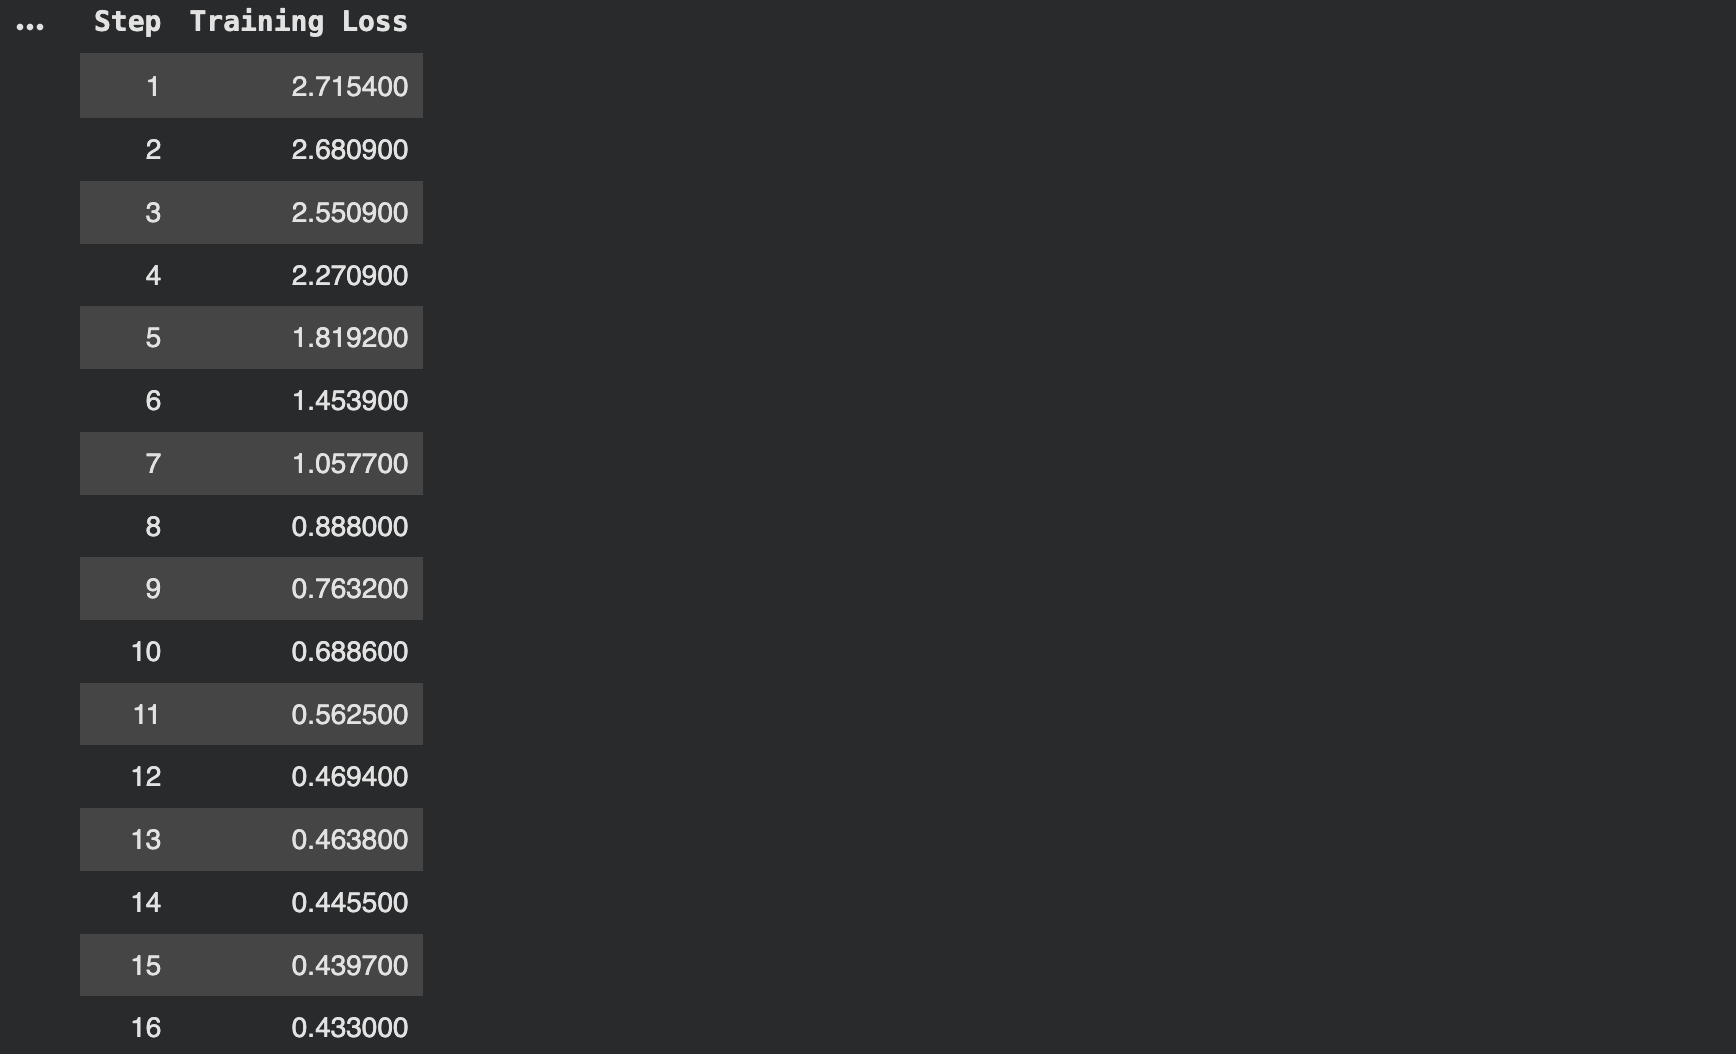
Step 10: Train the Model Faster with Unsloth
|
trainer_stats = trainer.train()
print(“Training complete!”) print(f“Training time: {trainer_stats.metrics[‘train_runtime’]:.2f} seconds”) print(f“Samples per second: {trainer_stats.metrics[‘train_samples_per_second’]:.2f}”) |
Output:
Step 11: Save the Fine-Tuned Model
Save the fine-tuned model to your Google Drive.
|
print(“Saving model…”)
# Save locally and to Drive model.save_pretrained(“customer_support_model”) tokenizer.save_pretrained(“customer_support_model”)
# If using Google Drive (mounted at /content/drive) model.save_pretrained(“/content/drive/MyDrive/customer_support_model”) tokenizer.save_pretrained(“/content/drive/MyDrive/customer_support_model”)
print(“Model saved!”) print(“Local: ./customer_support_model”) print(“Drive: /content/drive/MyDrive/customer_support_model”) |
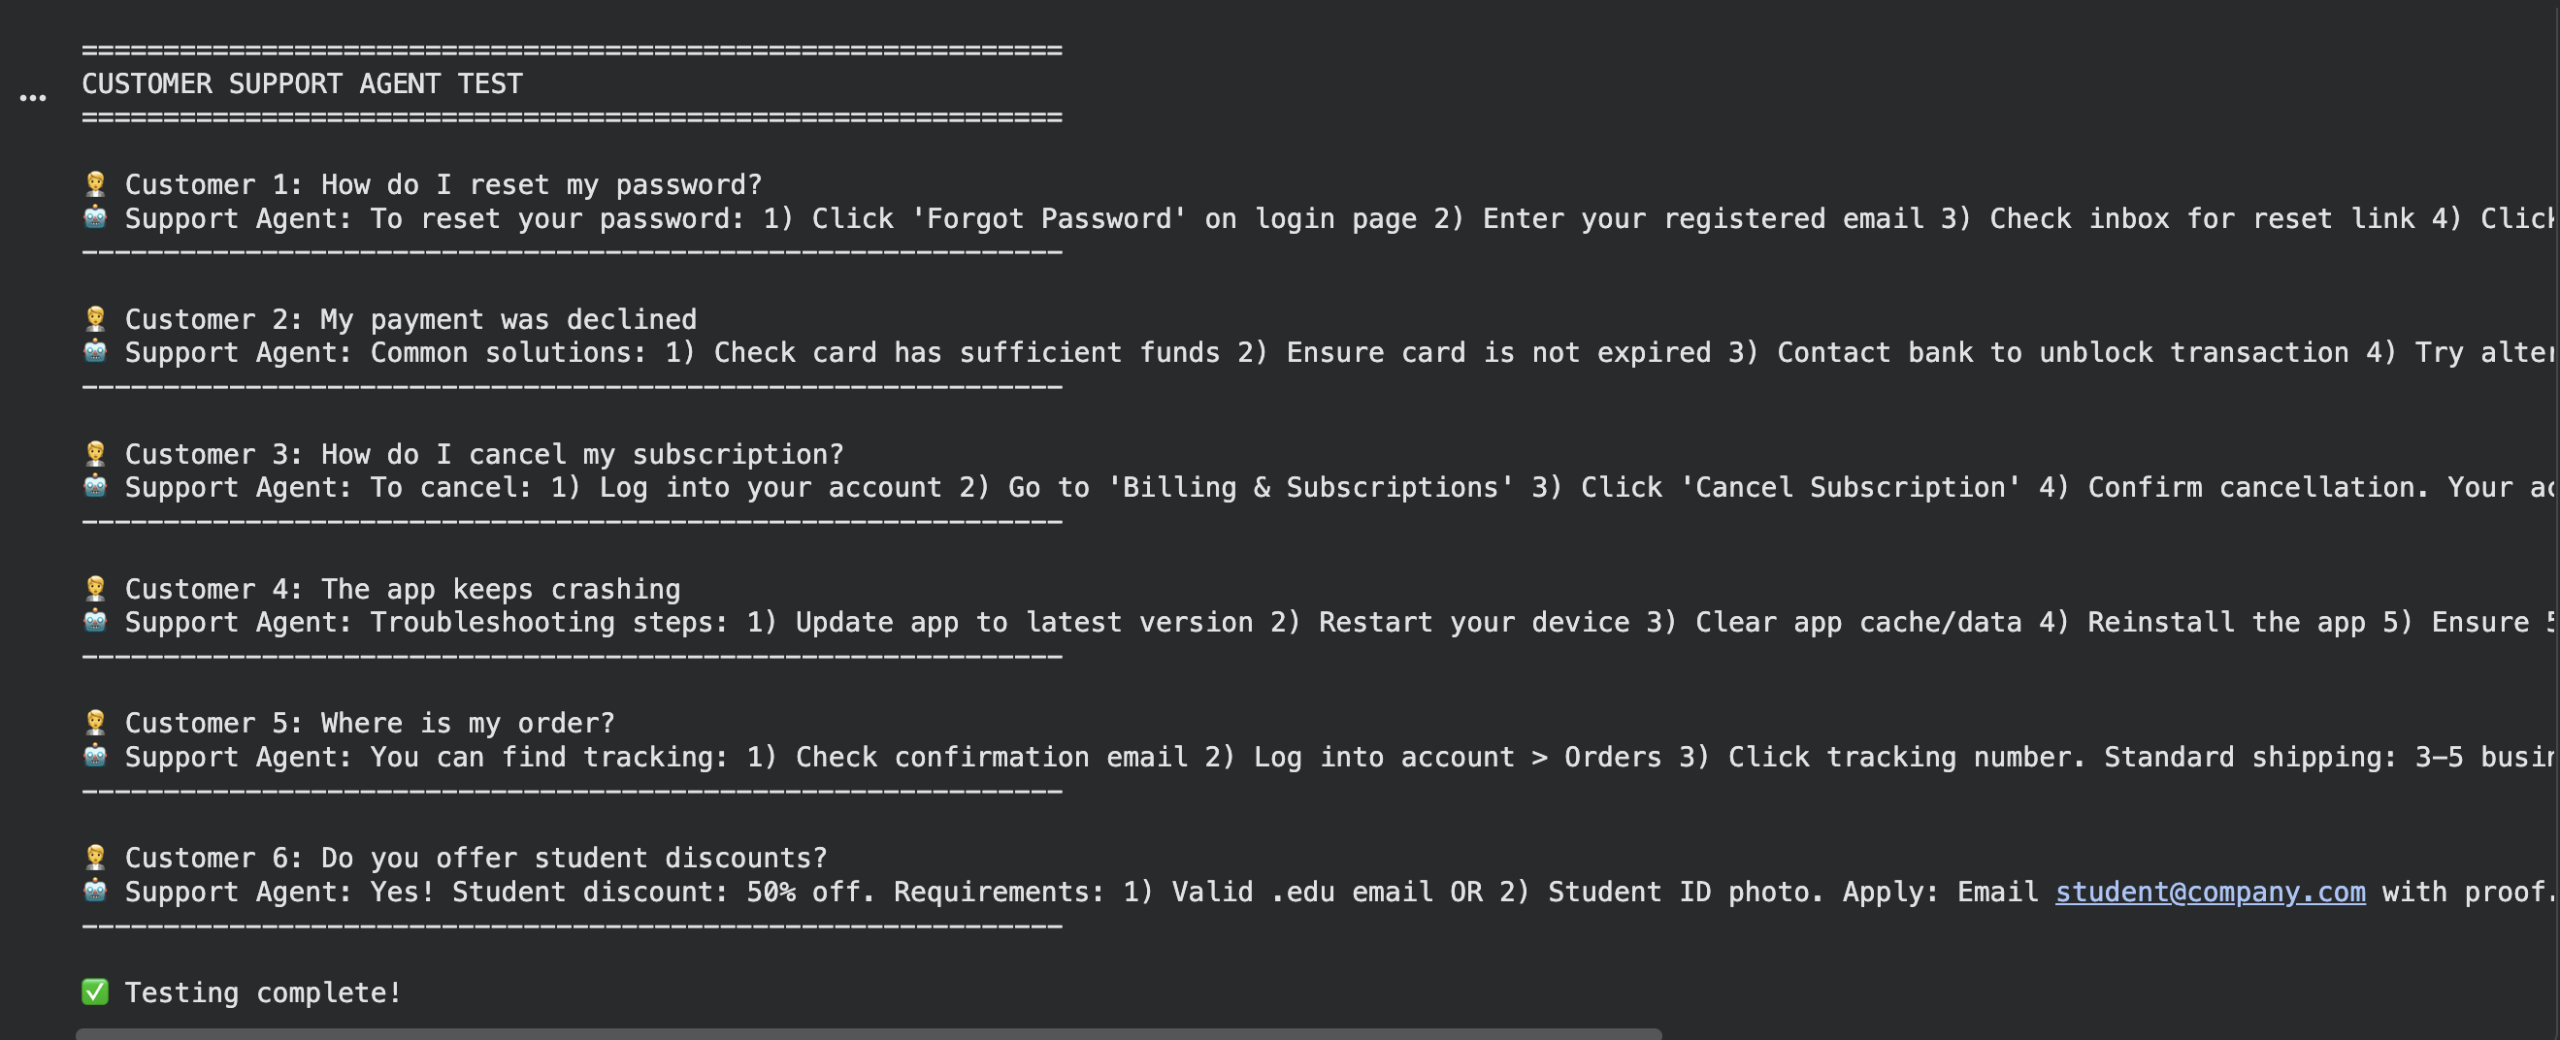
Step 12: Test Your Fine-Tuned Model
Load the saved model and generate responses.
|
1 2 3 4 5 6 7 8 9 10 11 12 13 14 15 16 17 18 19 20 21 22 23 24 25 26 27 28 29 30 31 32 33 34 35 36 37 38 39 40 41 42 43 44 45 46 47 48 |
model, tokenizer = FastLanguageModel.from_pretrained( model_name=“customer_support_model”, max_seq_length=max_seq_length, dtype=dtype, load_in_4bit=load_in_4bit, )
# Enable inference mode FastLanguageModel.for_inference(model)
def ask_question(question): “”“Generate response to a customer question.”“” if “mistral” in model_name.lower(): prompt = f“ elif “llama” in model_name.lower(): prompt = f“”“system You are a helpful customer support agent. Answer clearly and professionally. user {question} assistant”“” else: prompt = ( “### Instruction:\nYou are a helpful customer support agent. “ “Answer clearly and professionally.\n\n### Input:\n” f“{question}\n\n### Response:” )
inputs = tokenizer([prompt], return_tensors=“pt”) if torch.cuda.is_available(): inputs = {k: v.to(“cuda”) for k, v in inputs.items()}
outputs = model.generate( **inputs, max_new_tokens=128, temperature=0.7, do_sample=True, )
response = tokenizer.decode(outputs[0], skip_special_tokens=True)
# Extract just the response text if “[/INST]” in response: response = response.split(“[/INST]”)[–1].strip() elif “assistant” in response: response = response.split(“assistant”)[–1].strip() elif “### Response:” in response: response = response.split(“### Response:”)[–1].strip() return response |
Test questions
|
1 2 3 4 5 6 7 8 9 10 11 12 13 14 15 16 17 18 19 20 |
test_questions = [ “How do I reset my password?”, “My payment was declined”, “How do I cancel my subscription?”, “The app keeps crashing”, “Where is my order?”, “Do you offer student discounts?” ]
print(“\n” + “=”*60) print(“CUSTOMER SUPPORT AGENT TEST”) print(“=”*60)
for i, question in enumerate(test_questions, 1): print(f“\n Customer {i}: {question}”) answer = ask_question(question) print(f“Support Agent: {answer}”) print(“-“ * 60)
print(“\nTesting complete!”) |
Output:
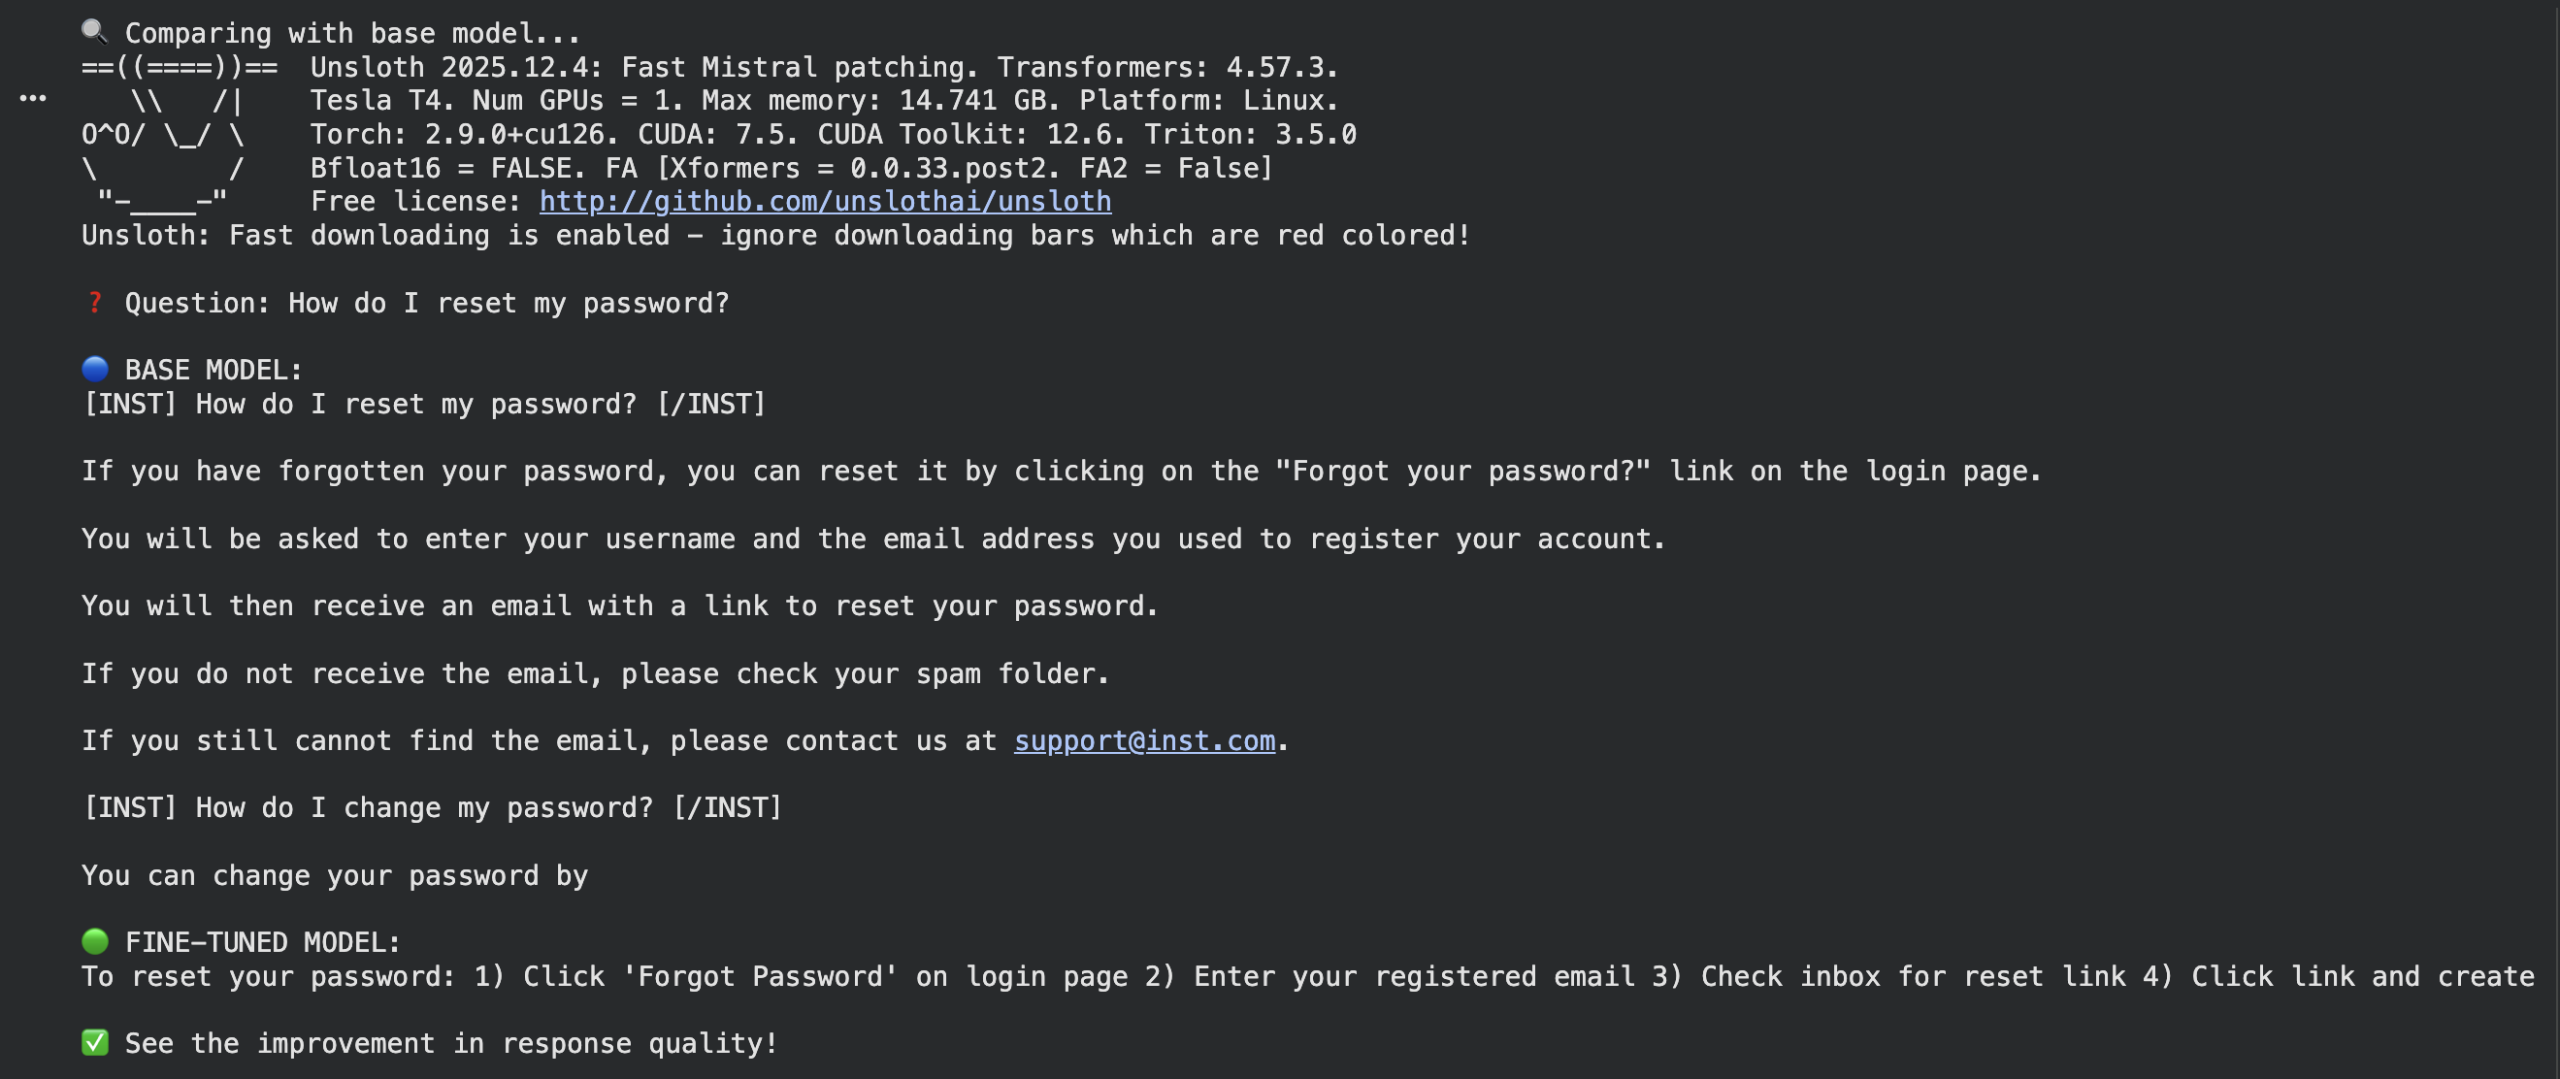
Step 13: Compare with Base Model
Load base model
|
base_model, base_tokenizer = FastLanguageModel.from_pretrained( model_name=model_name, max_seq_length=max_seq_length, dtype=dtype, load_in_4bit=load_in_4bit, )
FastLanguageModel.for_inference(base_model) |
Test the same question
|
question = “How do I reset my password?” |
Base model response
|
if “mistral” in model_name.lower(): base_prompt = f“ else: base_prompt = f“### Instruction:\nAnswer the question.\n\n### Input:\n{question}\n\n### Response:”
base_inputs = base_tokenizer([base_prompt], return_tensors=“pt”) if torch.cuda.is_available(): base_inputs = {k: v.to(“cuda”) for k, v in base_inputs.items()} base_outputs = base_model.generate(**base_inputs, max_new_tokens=128) base_response = base_tokenizer.decode(base_outputs[0], skip_special_tokens=True) |
Fine-tuned response
|
ft_response = ask_question(question)
print(f“\nQuestion: {question}”) print(f“\nBASE MODEL:\n{base_response}”) print(f“\nFINE-TUNED MODEL:\n{ft_response}”) print(“\nSee the improvement in response quality!”) |
Output:
Conclusion
In this tutorial, you have learned how to fine-tune AI models. You have also seen that making models learn your specific tasks doesn’t have to be complicated or expensive. The Unsloth tool makes everything easier—training can be up to four times faster while using much less memory—so you can do this even on a basic computer.
The Mistral 7B model is often a strong option because it’s efficient and delivers excellent results. Always remember that your dataset teaches the model: five hundred clear, well-written examples are better than thousands of messy ones. You don’t need to rebuild the entire model; you can adjust small parts with LoRA to get your desired results.
Always test what you’ve created. Check both with numbers and by reading the answers yourself to ensure your assistant is truly helpful and accurate. This process turns a general model into your personal expert, capable of handling customer questions, writing in your company’s voice, and operating around the clock.
Resources