
During our SwiftUI Workshop we often notice that very few people seem to know about transitions, even though they’re not very complicated and incredibly useful.
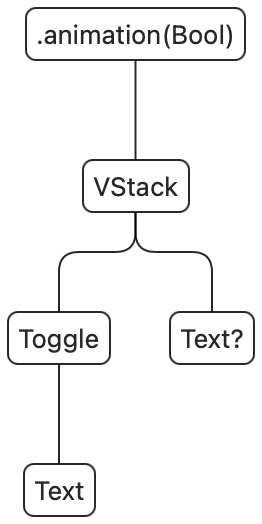
Transitions happen when a view is removed from the view tree, or added to the view tree. However, if you’ve done some SwiftUI, you will have noticed that there is no actual way to add views to the view tree — there is no addSubview(_:). Instead, you can only add and remove views through the combination of a state change and using an if statement (or switch or ForEach). In other words, views are somehow added and removed for us automatically, yet transitions fire only once. Before we dive into the details of this, let’s consider a very simple transition:
								struct ContentView: View {
    @State var visible = false
    var body: some View {
        VStack {
            Toggle("Visible", isOn: $visible)
            if visible {
                Text("Hello, world!")
            }
        }
        .animation(.default, value: visible)
    }
}
When we run the above code we can see the text fade in and out. This is the default transition (.opacity). When the view gets inserted into the view tree, it fades in, and once it gets removed it fades out. Note that if the body executes again, the view doesn’t fade in again unless the condition in the if statement changes.
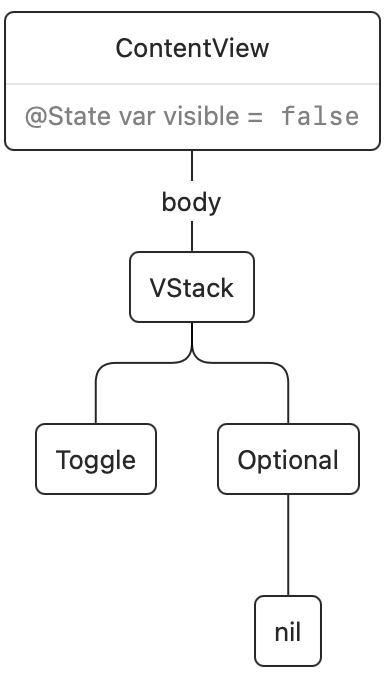
To build up a mental model of what’s happening, we can consider the SwiftUI view tree for the above view:
SwiftUI views are ephemeral: the body of ContentView gets executed and from it a render tree is created. This render tree is persistent across view updates, and it represents the actual views on screen. Once the render tree is updated, the value for body then goes away. Here’s the render tree after the initial rendering:
Once we tap the switch, a state change happens and the body of ContentView executes again. The existing render tree is then updated. In this case, SwiftUI noticed that the if condition changed from false to true, and it will insert our Text view into the render tree:
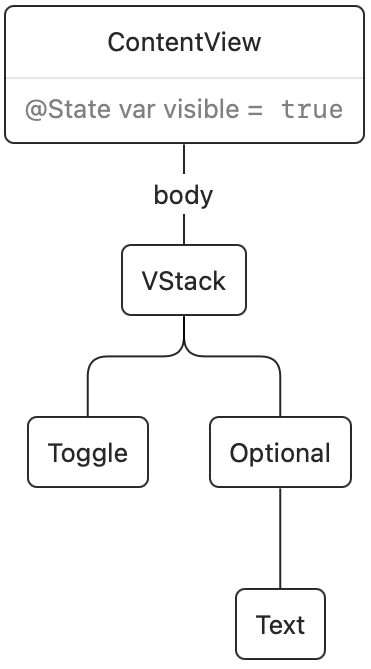
The change in the render tree is what triggers the transition. Transitions only animate when the current transaction contains an animation. In the example above, the .animation call causes the transition to animate.
The render tree does not actually exist with that name or form, but is simply a model for understanding how SwiftUI works. We’re not completely sure how these things are represented under the hood.
When we change our view to have an if/else condition, things get a bit more interesting. Here’s the code:
								struct ContentView: View {
    @State var visible = false
    var body: some View {
        VStack {
            Toggle("Visible", isOn: $visible)
            if visible {
                Text("Hello, world!")
            } else {
                Image(systemName: "hand.wave")
            }
        }
        .animation(.default, value: visible)
    }
}
When we render the initial view tree, it will contain a VStack with a Toggle and a Text. Once the state changes from false to true, the text is replaced by an image. In the ephemeral view tree there is always either the Text or the Image, never both. In the render tree however, during the animation the tree will contain both views:
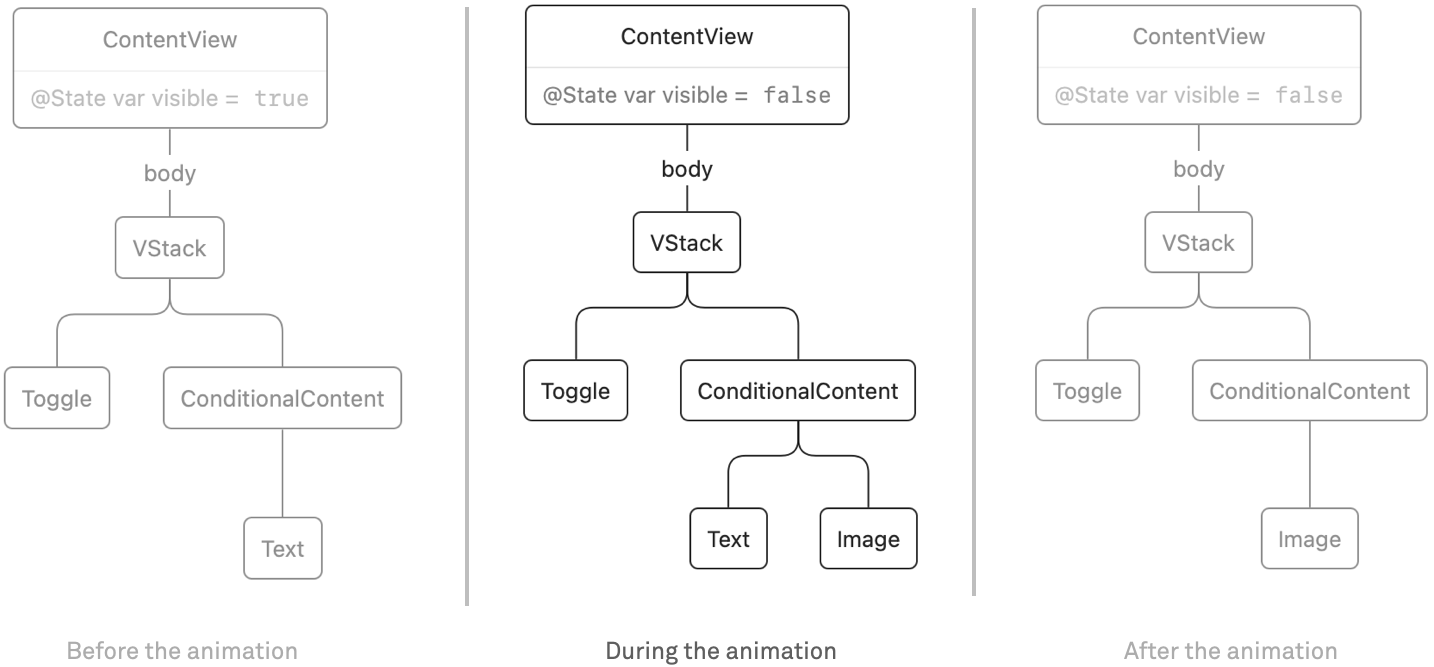
Because we use the default transition, it looks like the text fades into the image and back. However, you can think of them as separate transitions: the text has a removal transition (fade out) and the image has an insertion transition (fade in).
We are not limited to the default fade transition. For example, here is a transition that slides in from the leading edge when a view is inserted, and removes the view by scaling it down:
let transition = AnyTransition.asymmetric(insertion: .slide, removal: .scale)
We can then combine it with an .opacity (fade) transition. The .combined operator combines both transitions in parallel to get the following effect:
								let transition = AnyTransition.asymmetric(insertion: .slide, removal: .scale).combined(with: .opacity)
VStack {
    Toggle("Visible", isOn: $visible)
    if visible {
        Text("Hello, world!")
            .transition(transition)
    } else {
        Text("Hello world!")
            .transition(transition)
    }
}
.animation(.default.speed(0.5), value: visible)
Note that in the sample above, we used a visible value to switch between the two Texts, even though they are the same. We can simplify the code a bit by using id(_:). Whenever the value we pass to id changes, SwiftUI considers this to be a new view in the render tree. When we combine this with our knowledge of transitions, we can trigger a transition just by changing the id of a view. For example, we can rewrite the sample above:
								let transition = AnyTransition.asymmetric(insertion: .slide, removal: .scale).combined(with: .opacity)
VStack {
    Toggle("Visible", isOn: $visible)
    Text("Hello, world!")
        .id(visible)
        .transition(transition)
}
.animation(.default.speed(0.5), value: visible)
Before the animation, the text is present, and during the animation the newly inserted view (with id(false)) is transitioned in, and the old view (with id(true)) is transitioned out. In other words: both views are present during the animation:
![]()
When the builtin transitions don’t cover your needs, you can also create custom transitions. There is the .modifier(active:identity) transition. When a view isn’t transitioning, the identity modifier is applied. When a view is removed, the animation interpolates in between the identity modifier and the active modifier before removing the view completely. Likewise, when a view is inserted it starts out with the active modifier at the start of the animation, and ends with the identity modifier at the end of the animation.
Here’s an example of a favorite button with a custom transition. This isn’t a perfect implementation (we would not hardcode the offsets and width of the button) but it does show what’s possible:
The full code is available as a gist.
Sometimes when performing a transition you might see unexpected side-effects. In our case we were almost always able to resolve these by wrapping the view we’re transitioning inside a container (for example, a VStack or ZStack). This adds some “stability” to the view tree that can help prevent glitches.
In essence, transitions aren’t very complicated. However, achieving the result you want can be a bit tricky sometimes. In order to effectively work with transitions you have to understand the difference between the view tree and the render tree. And when you want to have custom transitions, you also need to understand how animations work. We cover this in both our workshops and our book Thinking in SwiftUI.
If your company is interested in a workshop on SwiftUI, do get in touch.