In this article, you will learn how to train a Scikit-learn classification model, serve it with FastAPI, and deploy it to FastAPI Cloud.
Topics we will cover include:
- How to structure a simple project and train a Scikit-learn model for inference.
- How to build and test a FastAPI inference API locally.
- How to deploy the API to FastAPI Cloud and prepare it for more production-ready usage.

Train, Serve, and Deploy a Scikit-learn Model with FastAPI
Image by Author
Introduction
FastAPI has become one of the most popular ways to serve machine learning models because it is lightweight, fast, and easy to use. Many machine learning and AI applications use FastAPI to turn trained models into simple APIs that can be tested, shared, and deployed in production.
In this guide, you will learn how to train, serve, and deploy a Scikit-learn model with FastAPI. We will start by setting up a simple project, then train a model on a toy dataset, build a FastAPI inference server, test it locally, and finally deploy it to FastAPI Cloud.
1. Setting Up the Project
Start by creating a new folder for your project and setting up a simple directory structure. This will help keep your training code, application code, and saved model files organized from the beginning.
Run the following commands in your terminal:
|
mkdir sklearn–fastapi–app cd sklearn–fastapi–app mkdir app artifacts touch app/__init__.py |
After that, your project structure should look like this:
|
sklearn–fastapi–app/ ├── app/ │ ├── __init__.py │ └── main.py ├── artifacts/ ├── train.py ├── pyproject.toml └── requirements.txt |
Next, create a requirements.txt file and add the following dependencies:
|
fastapi[standard] scikit–learn joblib numpy |
These packages will be used to build and run the API, train the Scikit-learn model, save the trained model, and handle numerical input data.
Once the file is ready, install the dependencies with:
|
pip install –r requirements.txt |
At this point, the project skeleton is ready, and you can move on to training your first Scikit-learn model.
2. Training the Machine Learning Model
In this section, you will train a simple Scikit-learn classification model using the built-in breast cancer dataset.
The script loads the dataset, splits it into training and testing sets, trains a RandomForestClassifier, evaluates its accuracy, and saves everything needed for inference into a .joblib file inside the artifacts folder.
Create a train.py file with the following code:
|
1 2 3 4 5 6 7 8 9 10 11 12 13 14 15 16 17 18 19 20 21 22 23 24 25 26 27 28 29 30 31 32 33 34 35 36 37 38 39 40 41 42 43 44 45 46 |
from pathlib import Path import joblib from sklearn.datasets import load_breast_cancer from sklearn.ensemble import RandomForestClassifier from sklearn.metrics import accuracy_score from sklearn.model_selection import train_test_split
def main(): data = load_breast_cancer() X = data.data y = data.target
X_train, X_test, y_train, y_test = train_test_split( X, y, test_size=0.2, random_state=42, stratify=y, )
model = RandomForestClassifier( n_estimators=200, random_state=42, ) model.fit(X_train, y_train)
predictions = model.predict(X_test) accuracy = accuracy_score(y_test, predictions)
artifact = { “model”: model, “target_names”: data.target_names.tolist(), “feature_names”: data.feature_names, }
output_path = Path(“artifacts/breast_cancer_model.joblib”) output_path.parent.mkdir(parents=True, exist_ok=True) joblib.dump(artifact, output_path)
print(f“Model saved to: {output_path}”) print(f“Test accuracy: {accuracy:.4f}”)
if __name__ == “__main__”: main() |
Once the file is ready, run the training script from your terminal:
You should see output similar to this:
|
Model saved to: artifacts/breast_cancer_model.joblib Test accuracy: 0.9561 |
This means the model was trained successfully, evaluated on the test split, and saved for later use in the FastAPI application.
3. Building the FastAPI Server
Now that the model has been trained and saved, the next step is to build a FastAPI server that loads the saved model and serves predictions through an API.
This application loads the model once when the server starts, provides a simple health check endpoint, and exposes a /predict route that accepts feature values and returns both the predicted class and class probabilities.
Create app/main.py with the following code:
|
1 2 3 4 5 6 7 8 9 10 11 12 13 14 15 16 17 18 19 20 21 22 23 24 25 26 27 28 29 30 31 32 33 34 35 36 37 38 39 40 41 42 43 44 45 46 47 48 49 50 51 52 53 54 55 56 57 58 59 60 61 62 63 64 65 66 67 68 69 70 71 72 73 74 75 76 77 78 79 80 81 82 83 84 85 86 87 88 89 90 91 92 93 94 95 96 97 98 99 100 101 102 103 104 105 106 107 108 109 110 111 112 113 114 115 116 117 118 119 |
from pathlib import Path import joblib import numpy as np from fastapi import FastAPI, HTTPException from pydantic import BaseModel
ARTIFACT_PATH = Path(“artifacts/breast_cancer_model.joblib”)
app = FastAPI( title=“Breast Cancer Prediction API”, version=“1.0.0”, description=“A FastAPI server for serving a scikit-learn breast cancer classifier”, )
class PredictionRequest(BaseModel): mean_radius: float mean_texture: float mean_perimeter: float mean_area: float mean_smoothness: float mean_compactness: float mean_concavity: float mean_concave_points: float mean_symmetry: float mean_fractal_dimension: float radius_error: float texture_error: float perimeter_error: float area_error: float smoothness_error: float compactness_error: float concavity_error: float concave_points_error: float symmetry_error: float fractal_dimension_error: float worst_radius: float worst_texture: float worst_perimeter: float worst_area: float worst_smoothness: float worst_compactness: float worst_concavity: float worst_concave_points: float worst_symmetry: float worst_fractal_dimension: float
@app.on_event(“startup”) def load_model(): if not ARTIFACT_PATH.exists(): raise RuntimeError( f“Model file not found at {ARTIFACT_PATH}. Run `python train.py` first.” )
artifact = joblib.load(ARTIFACT_PATH) app.state.model = artifact[“model”] app.state.target_names = artifact[“target_names”]
@app.get(“/health”) def health(): return {“status”: “ok”}
@app.post(“/predict”) def predict(request: PredictionRequest): try: features = np.array([[ request.mean_radius, request.mean_texture, request.mean_perimeter, request.mean_area, request.mean_smoothness, request.mean_compactness, request.mean_concavity, request.mean_concave_points, request.mean_symmetry, request.mean_fractal_dimension, request.radius_error, request.texture_error, request.perimeter_error, request.area_error, request.smoothness_error, request.compactness_error, request.concavity_error, request.concave_points_error, request.symmetry_error, request.fractal_dimension_error, request.worst_radius, request.worst_texture, request.worst_perimeter, request.worst_area, request.worst_smoothness, request.worst_compactness, request.worst_concavity, request.worst_concave_points, request.worst_symmetry, request.worst_fractal_dimension, ]])
model = app.state.model target_names = app.state.target_names
prediction_id = int(model.predict(features)[0]) probabilities = model.predict_proba(features)[0]
return { “prediction_id”: prediction_id, “prediction_label”: target_names[prediction_id], “probabilities”: { target_names[i]: float(round(probabilities[i], 6)) for i in range(len(target_names)) } }
except Exception as e: raise HTTPException(status_code=500, detail=str(e)) |
This FastAPI app does three useful things.
It loads the trained model once during startup, exposes a /health endpoint so you can quickly check whether the server is running, and provides a /predict endpoint that accepts input features and returns an inference result. This makes it easy to turn your Scikit-learn model into a reusable API that other applications or services can call.
4. Testing the Model Inference Server Locally
With the FastAPI app ready, the next step is to run it locally and test whether the prediction endpoint works as expected. FastAPI makes this easy because it automatically detects your application, starts a local development server, and provides built-in interactive API documentation that you can use directly from the browser.
Start the server with:
Once the server starts, FastAPI will serve the API locally, usually on port 8000.
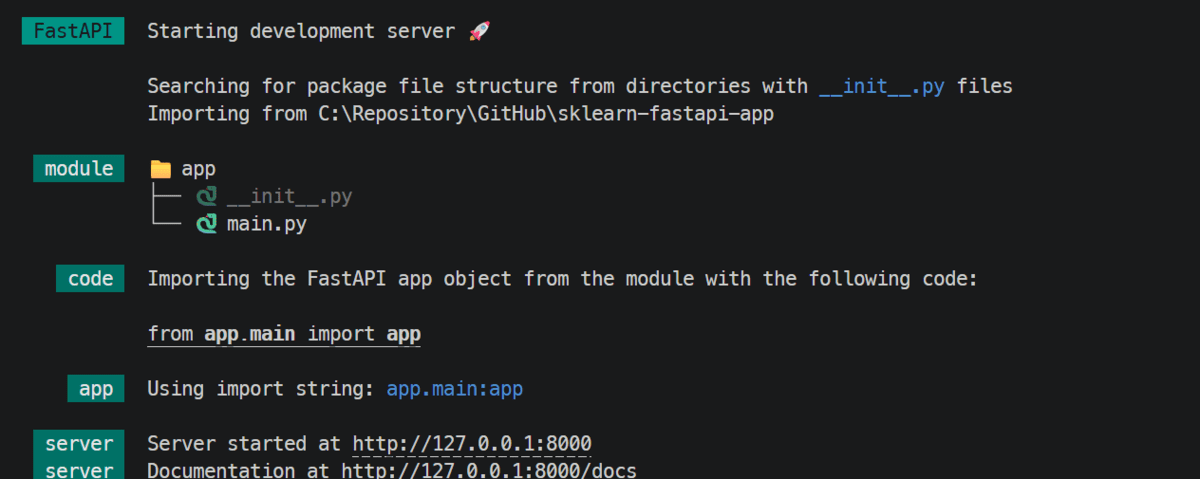
FastAPI will serve the API locally
Next, open the interactive API docs in your browser:
|
http://127.0.0.1:8000/docs |
Inside the docs page, you can test the /predict endpoint directly. Expand the endpoint, click Try it out, paste in the input values, and execute the request.
You can also test the API from the terminal using curl:
|
1 2 3 4 5 6 7 8 9 10 11 12 13 14 15 16 17 18 19 20 21 22 23 24 25 26 27 28 29 30 31 32 33 34 |
curl –X POST “ \ –H “Content-Type: application/json” \ –d ‘{ “mean_radius”: 17.99, “mean_texture”: 10.38, “mean_perimeter”: 122.8, “mean_area”: 1001.0, “mean_smoothness”: 0.1184, “mean_compactness”: 0.2776, “mean_concavity”: 0.3001, “mean_concave_points”: 0.1471, “mean_symmetry”: 0.2419, “mean_fractal_dimension”: 0.07871, “radius_error”: 1.095, “texture_error”: 0.9053, “perimeter_error”: 8.589, “area_error”: 153.4, “smoothness_error”: 0.006399, “compactness_error”: 0.04904, “concavity_error”: 0.05373, “concave_points_error”: 0.01587, “symmetry_error”: 0.03003, “fractal_dimension_error”: 0.006193, “worst_radius”: 25.38, “worst_texture”: 17.33, “worst_perimeter”: 184.6, “worst_area”: 2019.0, “worst_smoothness”: 0.1622, “worst_compactness”: 0.6656, “worst_concavity”: 0.7119, “worst_concave_points”: 0.2654, “worst_symmetry”: 0.4601, “worst_fractal_dimension”: 0.1189 }’ |
The response will be returned as JSON, including the predicted class ID, the predicted label, and the probability scores for each class.
This confirms that the inference server is working locally and is ready to be deployed.
5. Deploying the API to the Cloud
Once you have finished testing the API locally, you can stop the development server by pressing CTRL + C. The next step is to deploy the application to FastAPI Cloud. FastAPI Cloud supports deployment directly from the CLI, and the standard flow is fastapi login followed by fastapi deploy.
Log in with:
After logging in, deploy the app with:
During the first deployment, the CLI can guide you through setup, such as selecting or creating a team and choosing whether to create a new app or link to an existing one.
FastAPI Cloud then packages and uploads your code, installs dependencies in the cloud, deploys the application, and verifies that deployment completed successfully. After the first deploy, it also creates a .fastapicloud directory in your project so later deployments are simpler.
A successful deployment will end with output similar to this:
|
✅ Ready the chicken! 🐔 Your app is ready at https://sklearn-fastapi-app.fastapicloud.dev |
Once the app is live, open the deployed docs page in your browser to check that the endpoints are working.
You can also test the deployed API from the terminal by replacing the local URL with your cloud URL.
Finally, you can go to the FastAPI Cloud dashboard, click your deployed app, and check the logs to monitor builds, startup behavior, and runtime issues.
What to Do Next
You now have a complete end-to-end workflow in place: a trained machine learning model, a FastAPI application for inference, local testing, and a deployment on FastAPI Cloud.
To take this further and reach a real production level, the next step is to make the API secure, tested, monitored, and able to handle real-world traffic reliably at scale.
- Secure the API by adding API key protection or a stronger authentication layer.
- Strengthen error handling so failures are clear, consistent, and easier to troubleshoot.
- Improve performance so the API can respond efficiently under heavier traffic.
- Test more deeply with unit tests, endpoint tests, and load testing.
- Add monitoring to track uptime, latency, errors, and overall usage.
- Refine deployment workflows with versioning, rollback plans, and safer releases.
That is what turns a working deployed API into one that can operate more reliably in the real world.